Whoopie Pies
This post may contain affiliate links. Read our disclosure policy.

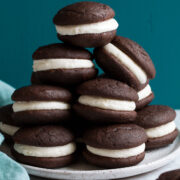
The ultimate Whoopie Pies – perfectly chocolatey, super soft and fluffy and filled with a luscious marshmallow fluff whoopie pie filling. Each bite of these decadent cake-like cookies truly just melts away in your mouth!
Do you have a weakness for chocolate? Also try my favorite Chocolate Cake, this irresistible Edible Chocolate Cookie Dough (with two other flavor options) and my go-to Brownies. February is national chocolate lovers month after all so we’d better celebrate.

The delicious whoopie pie (also known as Gobs what a funny name)!
You’ll find a many variations of this New England and Pennsylvania favorite. But the most common chocolate version you’ll find online seems to be a butter based cookie.
This in my opinion creates more of a dense and dry cookie, but for whoopie pies I’m all about keeping them light and fluffy (that classic Amish style). So I go with a vegetable oil and water based batter, just like a classic chocolate cake which these cookies are mimicking.
And traditional filling is usually made up of raw egg whites (which I’m fine eating myself but not comfortable serving to other people) and shortening (which I’m not a fan of altogether). So I instead I go with a store-bought marshmallow fluff and butter to build up the flavor and texture of the filling.
What do these Whoopie Pies taste like? Well of course chocolate cake, or something similar to a Ding Dong but obviously a hundred times better!
They’re rich and deeply chocolatey, they’re perfectly moist and that fluffy marshmallow whoopie pie filling keeps that light as air texture going throughout.
These are such a dreamy, easy to make sandwich cookie you’ll get requests for time and time again!
Watch the Video!

Ingredients Needed for Chocolate Whoopie Pies and Filling (Plus Substitutes)
- All-purpose flour – I recommend using unbleached flour but the standard bleached all-purpose flour will work as well.
- Unsweetened cocoa powder – use good quality cocoa for the best tasting cookies.
- Baking soda – this helps the cookies rise. Use baking soda that hasn’t expired so ensure it works properly.
- Salt – this will keep the cookies from tasting flat, don’t forget it!
- Light brown sugar – in a pinch you can make your own brown sugar. To do measure out 1 cup white sugar, omit 1 Tbsp and replace with 1 Tbsp molasses, mix well.
- Buttermilk – don’t keep buttermilk on hand? You can make your own just mix 1/2 cup milk with 1 1/2 tsp vinegar or lemon juice. Rest 5 minutes.
- Vegetable oil – canola oil will work fine too.
- Egg – the egg helps bind the ingredients together, but if there is an allergy you can check these substitutes here.
- Vanilla extract – vanilla bean paste (equal amounts) can be used as well.
- Hot water – just hot from the tap is fine no need to heat.
For the filling you’ll also need:
- Butter – I use both unsalted and salted to balance out the sweetness of the filling. I don’t like to add salt separately because it doesn’t dissolve well.
- Marshmallow fluff (aka marshmallow creme) – if you’d like you could just skip the filling recipe altogether and replace with a homemade marshmallow fluff.
- Powdered sugar – this sweetens and thickens up the filling. Unfortunately with this super fine, powdery texture there aren’t any great substitutes for powdered sugar (aka confectioners sugar) in frosting and fillings like so.

How to Make Whoopie Pies
- Prepare oven and baking sheets: Set over racks in upper and lower third of the oven and preheat oven to 375 degrees. Line 18 by 13-inch baking sheets with parchment paper, set aside.
- Whisk dry ingredients: In a mixing bowl whisk together flour, cocoa powder, baking soda and salt.
- Mix wet ingredients: In a large mixing bowl using an electric hand mixer or in the bowl of a stand mixer fitted with the paddle attachment mix together brown sugar, buttermilk, vegetable oil, egg and vanilla extract until well blended.
- Blend wet and dry mixtures: Add flour mixture and mix just until combined, then pour in hot water and mix just until combined.
- Drop batter onto prepared baking sheets: Scoop batter out using a medium cookie scoop or 1 1/2 Tbsp at a time, and drop onto prepared baking sheets, spacing 2-inches apart.
- Bake until set: Bake first two sheets at a once, rotating sheets halfway through baking, until cookies spring back when touched or toothpick inserted into center comes out clean, about 8 – 10 minutes total.
- Cool completely: Let cool about 5 minutes then use a spatula to transfer to a wire rack to cool completely. Bake remaining last sheet of cookies in center of the oven, about 8 – 10 minutes.

How to Make Whoopie Pie Filling
- Cream butter and sugar: Cream In the bowl of an electric stand mixer fitted with the paddle attachment (or using a hand mixer) cream together unsalted butter, salted butter and powdered sugar on low speed until well combined.
- Whip till fluffy: Increase mixer speed to high and whip until until light and fluffy, about 4 minutes. Blend in vanilla.
- Fold in marshmallow fluff: Remove bowl from stand mixer, add marshmallow fluff and fold together using a rubber spatula just until combined.
- Chill filling: chill mixture about 20 minutes to thicken up then fold again.
- Fill cookies: Transfer to a piping bag fitted with a large round tip and pipe over half of the cookies, sandwich a second cookie over the top.
How to Store Whoopie Pies
- Store them in an airtight container set on parchment paper (I like to store on a baking sheet covered with a lid).
- Keep in the refrigerator up to 3 days.
- Let rest at room temperature about 30 minutes before serving to let filling and cookies soften up a bit.

Tips for the Best Whoopie Pies
- Don’t over-mix the batter for a fluffy texture. Same with the filling.
- If cocoa is lumpy here, and just about anytime when baking, sift it first.
- If brown sugar is clumpy break up those clumps with your fingertips before using. You may also one to consider purchasing one of those clay brown sugar disks to help keep it moist.
- Chill filling a bit before adding to the cookies and keep it cool otherwise it will be runny. The fridge helps firm the butter back up making for a slightly firmer filling.
- It summer months keep these away from the heat, not a cookie you want to serve at an outdoor lunch party unless serving from a cooler.
- Store in a single layer, no stacking. They’ll start to stick together since they’re moist and the filling will get flattened and run out the sides otherwise.

Possible Variations
- Use Dutch cocoa for even richer flavor.
- Go for a classic egg white whoopie pie filling at your own discretion (no serving to elderly, children and pregnant women).
- Use a different flavor of filling like cream cheese, caramel, coconut, chocolate or peanut butter. Or just flavor the filling recipe with a little extract like coconut extract.
- Fill with sweetened whipped cream instead.
- Add 1 tsp of instant espresso powder to the batter.
- For a filling less prone to running just use buttercream frosting, 1/2 batch of vanilla buttercream or chocolate buttercream.
- For a festive cookie during the holiday season, add a little peppermint extract to batter or filling and roll edges of filling in finely crushed candy canes for peppermint whoopie pies.

More Delicious Sandwich Style Cookies to Try
- Pumpkin Oatmeal Whoopie Pies
- Banana Bread Whoopie Pies
- Carrot Cake Cookies
- Red Velvet Oreos
- Alfajores
Follow Cooking Classy
Whoopie Pies
Ingredients
Cookies
- 2 cups (283g) unbleached all-purpose flour* (scoop and level to measure)
- 1/2 cup (45g) unsweetened cocoa powder (scoop and level to measure)
- 1 tsp baking soda
- 1/2 tsp salt
- 1 cup packed (200g) light brown brown sugar, break up any clumps
- 1/2 cup (120ml) buttermilk (no buttermilk substitutes!)
- 1/2 cup (120ml) vegetable oil
- 1 large egg
- 1 1/2 tsp vanilla extract
- 1/2 cup (120ml) hot water
Filling
- 8 Tbsp (113g) salted butter, at room temperature
- 6 Tbsp (85g) unsalted butter, at room temperature
- 2 1/4 cups (270g) powdered sugar
- 1 tsp vanilla extract
- 10 oz. marshmallow fluff (aka marshmallow creme, about one and half 7 oz. jars)
Instructions
- Set oven racks in upper and lower third of the oven and preheat oven to 375 degrees. Line 18 by 13-inch baking sheets with parchment paper, set aside.
- In a medium mixing bowl whisk together flour, cocoa powder, baking soda and salt. Set aside.
- In a large mixing bowl using an electric hand mixer or in the bowl of a stand mixer fitted with the paddle attachment mix together brown sugar, buttermilk, vegetable oil, egg and vanilla extract until well blended.
- Add flour mixture and mix just until combined, then pour in hot water and mix just until combined.
- Scoop batter out using a medium cookie scoop or 1 1/2 Tbsp at a time, and drop onto prepared baking sheets, spacing 2-inches apart.
- Bake first two sheets at a once, rotating sheets halfway through baking, until cookies spring back when touched or toothpick inserted into center comes out clean, about 8 - 10 minutes total.
- Let cool about 5 minutes then use a spatula to transfer to a wire rack to cool completely. Bake remaining last sheet of cookies in center of the oven, about 8 - 10 minutes.
For the filling
- In the bowl of an electric stand mixer fitted with the paddle attachment (or using a hand mixer) cream together salted butter, unsalted butter and powdered sugar on low speed until well combined.
- Increase mixer speed to high and whip until until light and fluffy, about 4 minutes. Blend in vanilla.
- Remove bowl from stand mixer, add marshmallow fluff and fold together using a rubber spatula just until combined.
- Chill mixture about 20 minutes to thicken up then fold again. Transfer to a piping bag fitted with a large round tip and pipe over half of the cookies, sandwich a second cookie over the top.
- Store cookies in an airtight container set on parchment paper, in a single layer in the refrigerator up to 3 days. Let rest at room temperature about 30 minutes before serving.
Notes
- A few reviewers have mentioned issues with batter being too runny. Be sure you are properly measuring the flour and cocoa - it should be scooped right from the package and leveled off not spooned and leveled (or better yet use a scale). If you are worried about it just include and extra 1/4 cup flour for thicker batter.
- Use Dutch cocoa for even richer flavor.
- Use a different flavor of filling like cream cheese, caramel, coconut, chocolate or peanut butter. Or just flavor the filling recipe with a little extract like coconut extract.
- Fill with sweetened whipped cream instead.
- Add 1 tsp of instant espresso powder to the batter.
- For a filling less prone to running just use buttercream frosting, 1/2 batch of vanilla buttercream or chocolate buttercream.
- For a festive cookie during the holiday season, add a little peppermint extract to batter or filling and roll edges of filling in finely crushed candy canes for peppermint whoopie pies.