Basic Homemade Bread
This post may contain affiliate links. Read our disclosure policy.

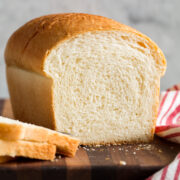
Homemade White Bread – A soft and fluffy, chewy and tender, perfectly delicious, basic bread recipe. A comforting classic that’s perfect warm with butter, used for homestyle sandwich bread, or served up as morning toast with jam.
Looking for other easy bread recipes? Try my quick 1-Hour Bread or the overnight, artisan-style No Knead Bread.

Easy Sandwich Style White Bread
To me, making bread is a total stress reliever. Just taking a moment to set all things aside and just spending a few minutes preparing bread dough, watching it seamlessly rise, then enjoying the fresh scent of the hot bread steaming through the oven vents.
As long as we can remember, bread has been at the table, and homemade bread just has a signature way of taking us back home.
My grandparents were bakers and always made the best homemade bread, and I’m hoping to pass that tradition on to my kids and grandkids to enjoy.
And isn’t it amazing how much better fresh bread tastes than the packaged stuff at the store or bakeries (filled with unnecessary ingredients)?
Here we just use 6 staple ingredients (and water), and it creates a delicious loaf of bread that will disappear right before your eyes. No one can resist a slice or two!
As a side note, if you are having trouble finding yeast right now and are craving bread, you can try Irish Soda Bread or Beer Bread. Or try my Buttermilk Biscuits. No yeast required!

Types of Yeast for Baking and Which to Use
There are actually eight types of yeast. The four that are commonly used in baking are:
- instant yeast (aka bread machine yeast)
- active dry yeast
- rapid rise yeast
- fresh yeast
For this recipe, you can actually use any of them. But methods vary slightly:
- For instant and rapid yeast, there is no pre-dissolving and resting first required (also known as “proofing” to ensure it is still alive and active).
- Active dry and fresh yeast should be dissolved and proofed before using.
- Also, when using fresh yeast (which is harder to come by and usually only has a two-week shelf life), you need to use twice the amount listed in the recipe.

Homemade Bread Ingredients and Substitutions
- All-purpose flour: Unbleached flour has a better flavor and texture than bleached flour. Bread flour works great here, too.
- Active dry yeast: Active dry yeast has always been what’s most commonly available to me, so that’s what I use here; it will need to be proofed first. As mentioned earlier, instant, rapid rise, or even fresh yeast works too.
- Table salt: Kosher salt or fine sea salt will work too (just add a little extra since the crystals are larger).
- Butter: I like to use unsalted butter to control the amount of salt added to the recipe; salted butter will work fine, just reduce salt by 1/8 tsp. In a pinch, you can even use vegetable oil or olive oil (don’t brush over finished loaf, though).
- Milk: Any fat content will work, though I prefer whole milk for a lightly richer flavor. Honestly, though the milk isn’t even a must, the loaf can be made with all water and no milk if you are out. It just boosts the flavor.
- Granulated sugar: Don’t worry, this isn’t a sweet bread. It just adds a faint background flavor. 2 Tbsp honey will work great too.
- Warm water: Critical to the recipe is making sure the water isn’t too hot (nothing past 120 degrees for active dry or instant yeast and nothing past 130 degrees for instant or rapid rise) or you can kill the yeast and your bread won’t rise.

How to Make Homemade Bread from Scratch
Here is an overview of the steps to making bread:
- Proof yeast in a mixer bowl with water and sugar.
- Mix in the remaining sugar, salt, milk, and about 2/3 of the flour using the paddle attachment.
- Switch to the dough hook attachment and mix in the remaining flour.
- Let knead until soft, elastic, and smooth.
- Transfer dough to an oiled bowl, cover, and let rise until doubled in volume. (Must be a large bowl to allow for rising.)
- Press the dough down, then pat and stretch it into a rectangle on a floured surface.
- Roll the dough up into a log.
- Transfer to a loaf pan or Dutch oven, cover with a damp cloth, and let rise until it’s about 2 inches above the height of the bread pan.
- Bake until golden brown and hollow-sounding when tapped on top.
- Let cool in loaf pans or on a wire rack and slice.
What Temperature to Bake Bread at?
If you have an instant-read thermometer (which is recommended for testing liquid temps used in the recipe), you can test the center of the loaf for doneness. For this type of bread, it should be 195 degrees f Fahrenheit in the center.
Can I Make Dough By Hand?
Yes. If you don’t own an electric stand mixer, this white bread can also be done the old-fashioned way – just by using a mixing bowl and a wooden spoon (and patience). Mix in as much flour as you can with the spoon, then as it starts to get heavy, knead in the remaining flour by hand.
Can I Make Homemade Bread in a Bread Machine?
Yes, this should work well in a bread machine as long as you have a 1 1/2 – 2 lb loaf machine.


Can I Double the Recipe?
Yes. If you want two loaves of bread, you can double the recipe if you have a larger mixer to fit the bulk capacity.
Can Bread Dough or Baked Bread be Frozen?
Yes, dough or baked bread can be frozen.
- To freeze bread dough: You’ll want to proceed through the first rise, roll into a log as directed, then freeze, thaw overnight in the fridge, and proceed to the second rise as directed (it will take longer since it’s cold).
- To freeze baked bread: Bake and let cool. Then wrap in foil and store in an airtight container for up to 1 month. Slice after thawing.
Can I Use Buttermilk in Place of Milk?
If you want a hit of tang, you can replace milk with buttermilk. Bring to room temperature by heating on 20% power in the microwave just until lightly warm, not 110 degrees. Don’t overheat or it will curdle.
What About Using Dry Milk?
Dry milk will work great too, just use 1/4 cup mixed with 3/4 cup water in place of the 3/4 cup milk. Or use 3 Tbsp buttermilk powder.

Tips for the Best Homemade White Bread
- Don’t use liquids that are too hot, or you’ll kill the yeast. Use a digital food thermometer to test temperatures.
- Check dates on yeast; expired yeast won’t work as well or may not even work at all.
- Adjust the amount of flour as needed. I live in a dry climate, so I don’t need as much flour as you may need in a humid environment. Dough should be soft and manageable, not very sticky.
- Allow enough time to rise for optimum fluffiness, but don’t overdo it or the loaf will be too airy and delicate.
- Don’t forget to grease the bread pan and plastic covering as well as your well-oiled bowl when rising, so there’s no sticking. Canola oil or a cup vegetable oil works well.
- Tent the loaf with foil if you find it’s browning too quickly on top when baking.
- Don’t over-bake or the loaf will be dry.
More Bread Recipes to Try
Follow Cooking Classy
Basic Homemade White Bread
Ingredients
- 3/4 cup (175ml) warm water, 110-115 degrees
- 2 1/2 tsp (9g) active dry yeast, or instant yeast* (see notes)
- 2 1/2 Tbsp (32g) granulated sugar, divided
- 1 1/2 tsp salt
- 3/4 cup (175ml) milk, warmed to 110-115 degrees
- 3 1/2 cups (496g) unbleached all-purpose flour or bread flour, then more as needed (scoop and level to measure)
- 3 Tbsp (42g) unsalted butter, softened, plus 1/2 Tbsp more for top
Instructions
- In the bowl of an electric stand mixer whisk together warm water, yeast and 1/2 Tbsp sugar. Let rest 10 minutes.**
- Fit mixer with paddle attachment. To yeast mixture add remaining 2 Tbsp sugar, salt, milk, butter and about 2/3 of the flour. Mix until well combined.
- Switch to hook attachment, add remaining flour and knead on low speed until it comes together well. Continue to knead on low speed, while adding a little more flour as needed to create a soft, non-sticky yet supple dough. Knead until mixture clears the sides of the bowl and becomes smooth, about 7 - 8 minutes.
- Transfer dough to an bowl sprayed with non-stick cooking spray. Spray a sheet of plastic wrap with non-stick cooking spray and cover bread (sprayed side down, don't wrap tightly just drape over so the dough has space to expand). Let rest until doubled in volume, about 1 - 1 1/2 hours.
- Press dough down then transfer to a lightly floured work surface. Pat and stretch dough to a rectangle about 14 by 8-inches.
- Roll dough up starting on one of the 8 inch ends and rolling to opposite side.
- Transfer to a greased 9 by 5-inch loaf pan. Spray a sheet of plastic wrap with non-stick cooking spray (or use plastic wrap used to cover bowl) and drape greased side down over bread pan leaving room for bread to expand, plastic wrap shouldn't be wrapped tight.
- Let rest until loaf is about 1 1/2 to 2-inches above the height of the bread pan, about 1 hour. Preheat oven to 350 degrees near the end of that rise period.
- Bake loaf in center of oven, rotating once halfway through baking, until golden brown on top and it sounds hallow when tapped, about 35 - 42 minutes.*** Loaf should register 195 degrees in center on an instant read thermometer.
- Remove from oven, run a stick of butter over top (using about 1/2 Tbsp). Transfer to a wire rack to cool at least 20 minutes before attempting to slice (who can resist a slice of warm bread? Just keep in mind it does slice cleanest once cooled through though).
- Store bread in an airtight container at room temperature for a few days or for longer shelf life store in the refrigerator.
Notes
- *If using instant yeast there's not need to proof (mix with water and sugar) and let rest. Instead just mix all ingredients in step 1 and 2 together.
- **It should bubble after after resting, if not yeast is bad or water was too hot. If needed you may need to begin with new yeast.
- ***If you find your oven is browning top too quickly before cooked through then tent with foil.
- I'm in a dry climate so I like to transfer the bread to an airtight container when it's still slightly warm. This way the loaf sort of steams in the container and softens the crust and traps moisture in.