Everyone reading this, please, you need to make this bread! I’m telling you, this is the best loaf of yeasted bread I have ever made! I’ve baked many o’ things, but funny thing until today I’ve never made my own loaf of no knead rustic bread. Seriously, why I have not tried it until now I can never tell you! I had no idea that such an incredibly quick and easy recipe could yield such amazing results. It is the perfect loaf of rustic bread, wonderfully crisp and chewy on the outside, while tender and even slightly moist on the inside. I can now officially say I’ve made a loaf of bread as good as a professional artisan bread baker thanks to the wonderful post over at Simply So Good. I’m so happy I found this recipe (from my countless hours of Pinterest gawking. Seriously I could spend my whole day on there, it’s dangerous). Never again will I pay $5 to buy a loaf of rustic bread at the store or bakery. Astoundingly I liked this even better and it had to cost less than .50 cents to make.
I also can’t wait to try many different variations on this simple recipe. Thank you thank you to Simply So Good for posting such an amazing recipe. Head over there for step by step photos, mix in ideas and to browse through the over 1,000 comments posted (when I saw there were over 1,000 comments I knew this recipe had to be good). I hope this recipe becomes a staple in your home too!
Ingredients
- 3 cups all-purpose flour
- 1 3/4 tsp salt
- 1/2 tsp active dry yeast
- 1 1/2 cups warm water (about 110 degrees)
Directions
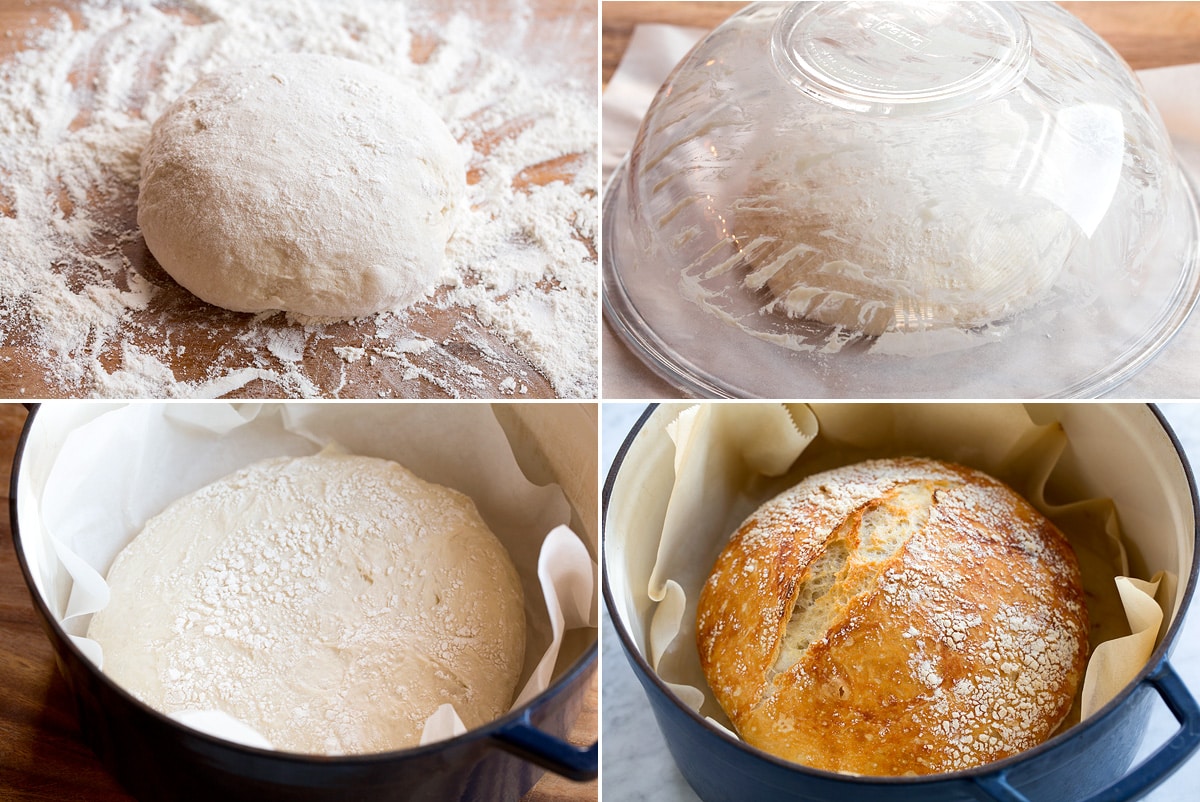
- In a large mixing bowl, whisk together flour, salt and yeast. Pour in warm water and stir mixture with a wooden spoon until a shaggy ball forms. Cover bowl with plastic wrap and allow to rise for 12 - 18 hours (on the counter at room temperature).
- Heat oven to 450 degrees. Once oven has reached 450 degrees, place a cast iron pot covered with lid into preheated oven, heat pot for 30 minutes.
- Meanwhile, turn dough out onto a heavily floured surface then shape dough into a ball. Cover dough with plastic wrap and allow to rest while pot is heating. Remove pot from oven and with floured hands, carefully drop dough into hot pot (you DON'T need to grease the pot) cover with lid, then immediately return pot to oven and bake 30 minutes (at 450 degrees). After 30 minutes, remove lid from pot and bake uncovered for 15 minutes. Remove from oven and allow bread to cool on a cooling rack. Once completely cooled, bread stores well in an open paper bag (it helps the bread maintain it's crisp crust. I wouldn't recommend storing it in an airtight container or ziploc bag).
- Recipe Source: adapted from Simply So Good, thank you for such an incredible post!
Notes
I made a wheat version of this with 1 1/2 cups whole wheat flour, 1 1/2 cups bread flour, 1 tsp salt, 1/2 tsp yeast, 2 Tbsp honey combine with 1 1/2 cups + 1/3 cup warm water and rise and cook according to directions listed. It was delicious!


Chung-Ah | Damn Delicious: Awesome! I’m all about “no-knead” bread! :) May 28, 2012 at 11:27pm
Jaclyn: With this recipe, I am now too! I never knew it could work so well. May 29, 2012 at 8:40am
Faith: Oh, my goodness… I can almost taste it! What a beautiful loaf! Thanks for posting the recipe. May 30, 2012 at 8:29am
Jaclyn: Faith – your welcome, thanks for the comment! I hope you enjoy! May 30, 2012 at 10:53am
Javelin Warrior: Every Friday, I share my favorite food finds in a series called Food Fetish Friday. I love this post so much I’m featuring it as part of the roundup (with a link-back and attribution) and I hope you have no objections. It’s a pleasure following your creations… June 1, 2012 at 6:38am
Jaclyn: Javelin Warrior – that’s awesome, definitely no objection, thanks for the repost! Have a great day! June 1, 2012 at 9:48pm
Correen: Incredible looking crusty bread AND it’s no knead…wow! Sharing on my foodie bread pin board and will definitely be trying this in my kitchen. June 3, 2012 at 7:13pm
lilybard: I was wondering if you leave this out at room temp or in the refridgerator? If it is humid or very warm would that effect the outcome and where it should be left to rise? June 4, 2012 at 3:21am
Lisa: Wow – what a beautiful loaf of bread! I am always afraid to try yeast baking. Is the 1/2 teaspoon of yeast “active dry yeast” in a packet or cake like yeast? Thanks! June 4, 2012 at 1:40pm
Jaclyn: Correen – thanks for sharing on your pin board =) and thanks for your comment!
Lisa – the yeast is active dry yeast, I don’t know that cake yeast would work well in this recipe as it is supposed to proof in 80 – 90 degree water and not have contact with salt. On Janet’s site (where I adapted the recipe from) she mentioned normal or instant yeast would work. I hope you enjoy, thanks for your comment! June 5, 2012 at 7:36am
Jaclyn: lilybard – If it is humid I don’t think it should effect the outcome much as long as you wrap the bowl tightly with plastic wrap (for the 12 – 18 hour rise). The warmth shouldn’t effect it too much as long as your home is an average room temperature. You may want to leave it to rise in a cool oven if your home is really warm. And it is at room temperature that it should be left to rise. Thanks for your comment. June 5, 2012 at 7:46am
view-from-here: I have everything except anything cast iron! I only have plain cookie sheets. But I am going to save this! June 5, 2012 at 7:11pm
Anonymous: What pot did you use? Why are there no pictures of it? I saw the original recipe, but have yet to make it as I don’t have a $200+ Le Creuset pot. June 5, 2012 at 10:51pm
nana: A Lodge cast iron will work. Cost for the right size is about $35. A 5 Qt size will work. April 21, 2013 at 9:49am
Jaclyn: Anonymous – I don’t own a Le Creuset pot either, I just got a cheap knock off at Sam’s club for $39. I’ve loved it and it even looks like the Le Creuset. In my opinion it works just as good as the Le Creuset and it has a lifetime warranty. So my advice, go for a cheaper enameled cast iron pot and don’t pay for the brand. June 7, 2012 at 10:53am
Monique The Better Martha: Never again will I head over to the bakery section of my grocery store for sub par bread. Home made all the way now! June 15, 2012 at 10:31pm
Anonymous: What if I don’t have cast iron pot, will anything else work? June 22, 2012 at 8:04pm
Anonymous: I just used my large pot that I usually use for Spaghetti, and it turned out delicious. But I am so proud of myself for successfully making bread. This will definitely be made a lot in my kitchen. Plus it’s really inexpensive because there are so few ingredients. I used whole wheat, because it’s all I had, and it takes really good. SUCCESS! June 23, 2012 at 1:14pm
Jaclyn: Anonymous – I’m hoping the anonymous posters question after yours answered your question because I’ve only ever tried it in a large cast iron pot. I think another large oven safe pot should work nearly the same. I hope you enjoy! June 24, 2012 at 7:46pm
Anonymous: This bread recipe is a real keeper. Could not be easier !! I followed the recipe as written, and added some sun dried tomatoes, fresh chopped basil, cheese, zest of 1 lemon and some fresh cracked black pepper. I let it sit from about 9pm till about 2pm the next day. I turned it out on a well floured board, and covered with the saran wrap. It sat about an hour while the oven heated up to 450*,and then while the pan was in the oven for 30 min heating up. The dough was sticky but went in the pot without a problem. It cooked in the stated amount of time, and smelled wonderful. I could hardly wait for it to cool down a bit before I sliced into it and topped it with some good salted Irish butter. It made a fabulous loaf, with a beautiful crust, and tender crumb.
I will be making this recipe again and again. My thanks to whoever invented it ! July 1, 2012 at 4:58pm
Anonymous: I would love to make the wheat version, but I was wondering if the smaller amounts of salt and yeast (as compared to the main recipe) are correct. Has anyone tried it? Thanks so much. September 27, 2012 at 7:31am
Jaclyn: Anonymous – the yeast is the same, but I decided to use less salt so more of the sweetness of the honey shines through and so it has lower sodium and is healthier =). Then I decided to use bread flour so it has more gluten (vs. white flour) to replace some of the gluten the wheat flour lacks. I hope you like it! I can’t get enough of this bread. September 27, 2012 at 7:51pm
Anonymous: Anyone try this on a pizza stone? I do not have a crock September 29, 2012 at 5:33pm
Jaclyn: anonymous – if you don’t have a dutch oven I’d highly recommend this recipe here:
http://www.makeandtakes.com/warning-easiest-recipe-for-homemade-bread
very similar and SO good! September 29, 2012 at 11:39pm
Anonymous: Thanks Jaclyn! That recipe looks great as well! September 30, 2012 at 8:01am
Anonymous: This bread was better than I could have imagined, thanks so much for sharing. October 1, 2012 at 5:57am
Anonymous: So you don’t knead at all?? Just put it on the flour and make a ball? Eeek I did knead mine based off of different instructions for the same recipe (they didn’t specify no knead) I hope its still yummy!! October 15, 2012 at 10:05am
Jaclyn: Anonymous – crazy I know, I don’t knead it at all. It’s the beauty of the recipe =). It’s crazy that it always turns out delicious without being kneaded. You’ll have to give it a try =). October 17, 2012 at 2:11pm
Anonymous: Tried this recipe, followed the instuctions to the letter…a very heavy bread..will use my old recipe and take the time to knead for a much better bread next time October 21, 2012 at 1:40pm
Bob Ciafone: not sure what im doing wrong, i even measure the ingredience with a scale/ My bread looks just like your but the crumb is chewy not airy. i cook it to an internal temp of 205 or so. its also a heavy crumb. please help, i really want to be able to bake a nice hard crust bread with an airy crumb.
Bob December 23, 2012 at 4:46pm
Jaclyn: I would recommend playing with the amount of water added to see how the results vary, also I would suggest letting it rise a few hours longer than you did previously. I hope that helps! December 29, 2012 at 11:03pm
Sandra: Thanks so much. I just made this bread today and it is the best I have ever made. Turned out perfectly and the crust was wonderful. I used an old deep Corningware Arctic White casserole with lid of mine and it worked perfectly. Definitely my go to bread recipe from now on. Reading the comments above, yes, maybe it was a bit heavy but I like it that way, that’s the genuine rustic bread feel. January 3, 2013 at 10:11am
Jaclyn: I agree, I like it heavy as well. Thanks for your comment! January 3, 2013 at 11:30pm
On Solid Ground | Gathered From Afar: [...] with her in the kitchen. I always wanted to learn to bake bread from her. I was thrilled to find this recipe! It was perfect for a first timer! With only 4 ingredients, too, it is free from sugars and [...] January 5, 2013 at 5:57pm
Jaclyn: It looks perfect! Thanks for the ping back! January 8, 2013 at 9:32pm
Pam Phillips: Just took it out of the oven and it’s wonderful I only let it rise for 5 hours January 27, 2013 at 8:15pm
Jaclyn: Good to know regarding 5 hrs =). Thanks for your comment and I’m glad you enjoyed it. I just made two loaves this past weekend, I can’t get enough of the stuff! January 28, 2013 at 10:30am
alana: Hey Jaclyn Thanks so much for the recipe def a keeper! February 20, 2013 at 8:04pm
Jaclyn: You’re very welcome Alana =)! February 20, 2013 at 8:24pm
Mary Dipentino: love this recipe was making it 3 time a week, but the last two times the bread was not cooked in middle, please help what am I doing wrong, same flour, same yeast. April 6, 2013 at 12:23pm
Jaclyn: Hi Mary I think this link may be helpful to you:
http://www.cheftalk.com/t/37569/bread-baking-problem
Sorry that has happened the last two times what a bummer! April 14, 2013 at 3:35pm
Carolyn: This turned out wonderfully, and it was my first attempt a making bread! I told my Mom about it, and she was a huge skeptic, couldn’t believe it didn’t need to go in the fridge or left to rise twice. After trying it she was a believer! If I want to put in add-ins, such as cinnamon and raisins what amounts would I use? Thanks! April 21, 2013 at 7:05am
Jaclyn: I’m so glad you and your mom enjoyed this bread Carolyn! As far as add-ins go I would probably do about 1 – 1 1/2 tsp of cinnamon and 1/2 cup – 1 cup of the raisins just depending on how much you want. April 25, 2013 at 6:47pm